Her house is massive, with two levels and basement. She has all new (1 yr old) HVAC systems throughout. There are three systems located in the basement, and one in the attic.
All four pieces of equipment are identical.
The basement and first floor of this amazing home are very comfortable.
But when you go upstairs, to the 2nd floor, something happens… especially in the largest suite up there. It gets obviously warmer during the summer season in that suite.
That’s why she called me.
Among insulation issues, I also discovered that her HVAC systems, although identical equipment, were not performing identically.
She’d already had the HVAC tech tell her, “Ms Homeowner, your system is operating fine. You need to consider more attic insulation.”
Sure, she will benefit from my insulation services… without a doubt. The home is 30 years old, and needs obvious help in the attic.
However, a BIG part of the problem had so far been missed!

Infrared don’t lie!
While on the first floor, I used my infrared thermometer to measure the AC airflow temperature at several vents… I showed her the readings: 48 degrees, 49 degrees, etc. Nice COLD AIRFLOW!
Together we walked upstairs, and while she watched I measured the AC airflow temperature at two vents. My instrument gave us readings of 65 degrees, 66 degrees, and never went lower.
WAIT! Didn’t the trained HVAC tech tell her that her 1 year old equipment was operating fine?
What’s the explanation for a difference of 14 degrees between those two floors? Thermostats are set at the same temperatures throughout the house.
DUH!
You guessed it! Place your AC equipment inside an inferno, and you’ll always get warm air out of a warm pipe.
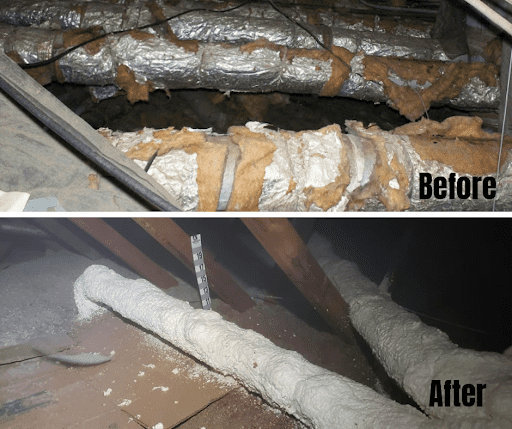
The tech wasn’t lying. The immediate problem is with the air ducts being suspended and strapped to the roof, like clothes on a clothesline. The straps squeeze the ducts, twists and turns restrict airflow, exposed & unprotected sheet metal sweats, and you end up with an inefficient, horrible, cruel joke-of-a-HVAC system for unsuspecting homeowners.
And, this is partly why simply “adding a few inches of attic insulation” doesn’t always cure these challenges of upstairs comfort.
Surface Temperatures… they burn you!
Since 2003, I’ve been measuring airflow temperatures and teaching homeowners how insulation and HVAC location, along with air duct design is connected to their indoor air quality and comfort.
Around 2012, I started measuring the surface temperature of air duct insulation. WOW, was I shocked! In a 130 to 140 degree vented attic, typical surface temperature of an air duct was always 100+ degrees, and often in the 120 degree range.
I’ve got lots of pictures to back this up. In fact, these quick “show-and-tells” easily sell my services over the other guys who only quote “adding a few inches of attic insulation”.
This kinda explains my quip, “It’s hard to get cold air out of a warm pipe”, doesn’t it! And it explains why spray foam attic encapsulation works so well at getting these homes with multiple floors more comfortable.
Potential
My HVAC friends tell me, and I read, that a properly charged residential AC system should be producing about 40 degree temperatures at the evaporator coil. After factoring in blowing 74 degree air across the evaporator coils, her AC system is not living up to its potential, in my opinion.
In fact, the supply airflow temperature should be about 15 to 22 degrees cooler than the air temperature at the return vent. With 75 degree return air, her supply temperature should be 53 to 60 degrees, and after my insulation upgrade, we’ll drop those temps a few more digits.
My Remedy
It’s clear to me that the longer your (expensive) cold air takes to get through your air ducts, the warmer it becomes. After all, the 2nd Law of Thermo-Dynamics tells us that hot always moves to cold. So who/what has the greater influence over temperature in your air ducts? The HOT inferno temperatures will always overwhelm your cold temperatures, (to a point of equilibrium) inside the fragile environment of those duct interiors.
So… we want to move more air through those air ducts, AND protect them from those 100+ degree surface temperatures.
How do I do that?
Increase air duct diameter, and improve efficiency by creating dedicated air ducts; and limiting twists, tight-turns, tight straps, and connections. Install high-velocity airflow grills on the vents.
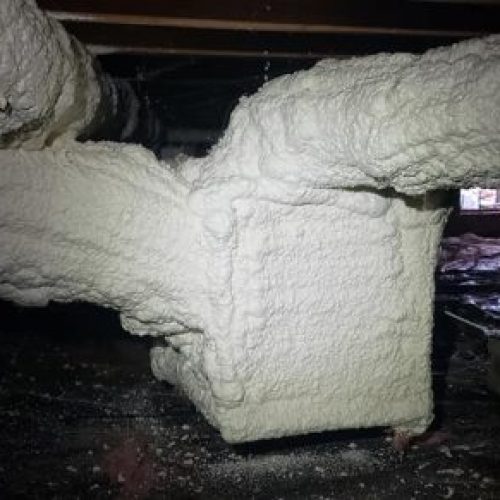
Spray the ducts & all connecting pieces with closed-cell spray foam insulation. This gives an added benefit of sealing the ducts too. Layer it up, thick!
When return air ducts are lying on the attic floor, after confirming that they’re efficient and tight, we simply bury them beneath a cozy layer of Applegate Bora-spray cellulose insulation as we upgrade the attic insulation. ** Remember, the lower I can keep the return air temperature, the potentially lower we get the supply air temperature!
Sometimes we have to add return vents, or change dirty filters… whatever it takes to increase airflow & equipment efficiency.
Are you encouraged?
My hope is that my article has encouraged you to consider this approach as an affordable alternative to (more expensive) spraying your roofline with spray foam insulation. Not everyone is comfortable with spray polyurethane foam insulation… and my experience after many years and hundreds of Atlanta homes tells me that you don’t have to suffer when you decide against spray foam.
Although this approach involves more labor, it can price out about 2/3rds the cost of spray foam encapsulation done right. No one wants to suffer from a cruel joke!


